
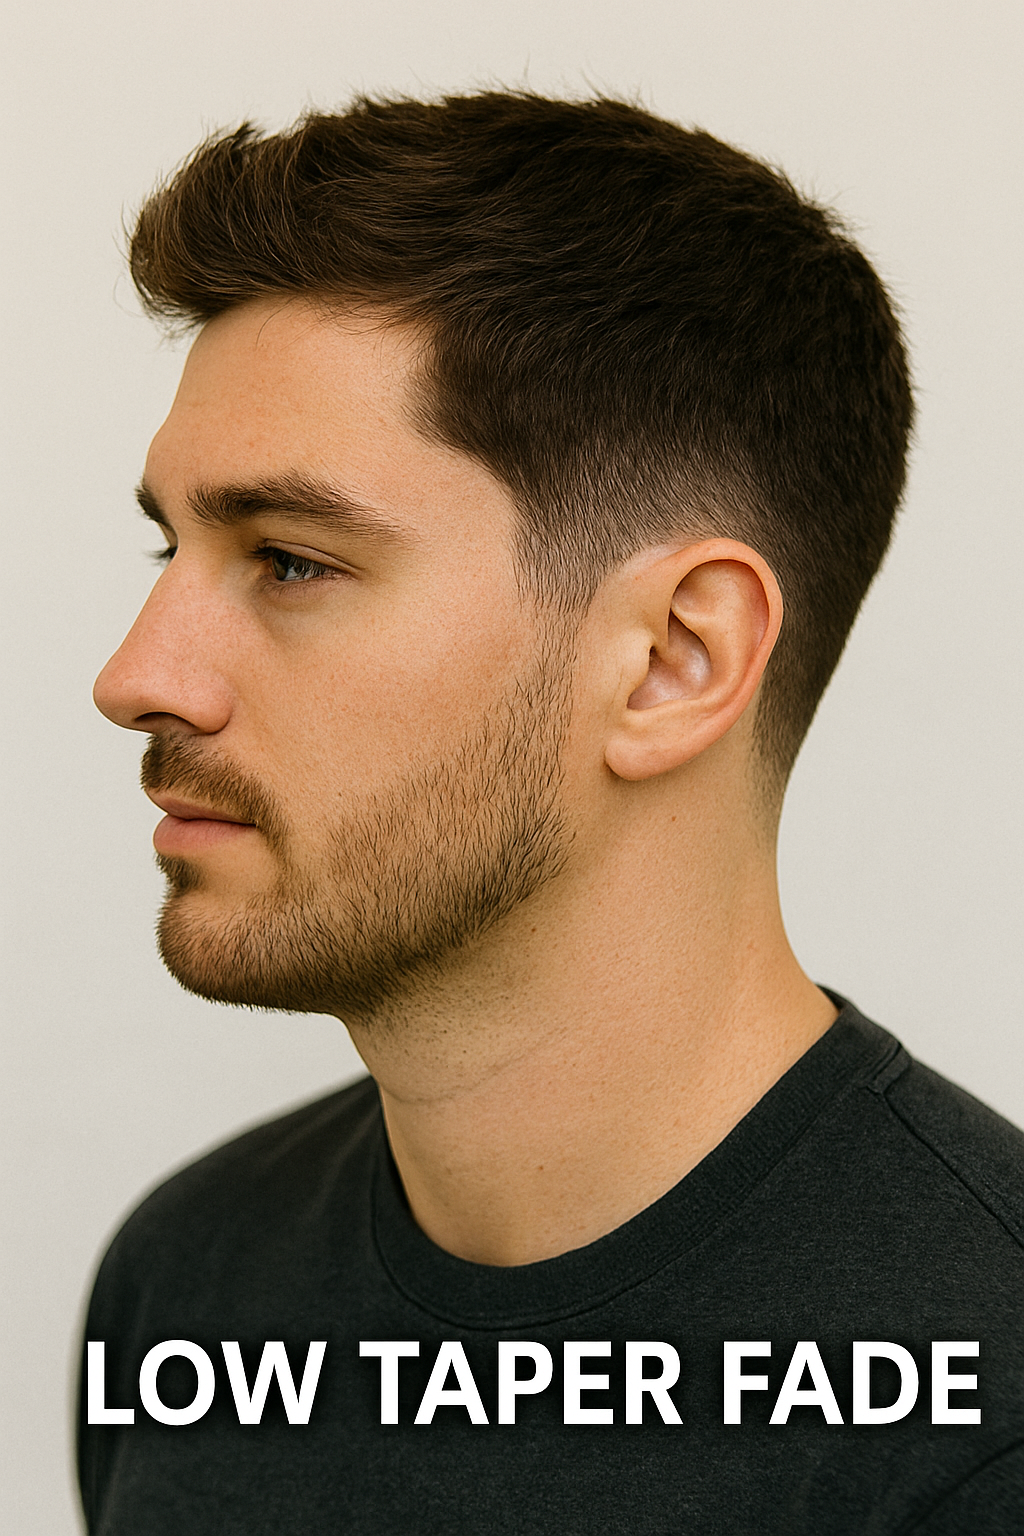
The Low Taper Fade is a timeless and versatile haircut, prized for its subtle yet sharp transition of hair length. It starts low on the head, typically just above the ears and around the natural neckline, providing a clean and polished look without being overly dramatic. This guide will walk you through the essential steps to achieve a professional-quality Low Taper Fade. Whether you're a budding barber or a brave DIYer, understanding these fundamentals is key. For foundational knowledge, resources from institutions like Pivot Point or textbooks from Milady can be invaluable.
Important Note for DIYers: Cutting your own hair, especially fades, can be challenging. It requires patience, good mirrors, and quality tools. If you're a beginner, consider practicing on a mannequin head first or having a friend assist, especially with the back. For the best results, visiting a professional barber is always recommended.

Tools You'll Need for a Low Taper Fade
Before you begin, gather the essential tools . Quality equipment makes a significant difference. Leading brands like Wahl and Andis offer a range of professional-grade clippers and trimmers.
- Hair Clippers : With a full set of guards (e.g., #0.5, #1, #1.5, #2, #3, #4). An adjustable lever is highly beneficial.
- Hair Trimmers (Outliners): For creating sharp lines and detailing.
- Combs: A cutting comb and a styling comb.
- Scissors/Shears: For blending the top section or refining the fade (optional but recommended for a polished look).
- Barber Cape or Towel: To keep hair off the person.
- Sectioning Clips: If the hair on top is long enough to get in the way.
- Handheld Mirror: Crucial for checking the back and sides.
- Water Spray Bottle: If you prefer to cut hair slightly damp (especially the top).
- Good Lighting: Essential to see details and ensure an even blend.
Learn how to execute a clean low taper fade step by step in this hands-on barber tutorial . Perfect for beginners and aspiring professionals.
Step-by-Step: How to Do a Low Taper Fade Haircut
Follow these detailed steps to execute a clean Low Taper Fade. Remember, patience and precision are your best friends here. Techniques are often shared by professionals on platforms like BehindTheChair.com.
- Preparation and Setup:
- Ensure the hair is clean , detangled, and either completely dry or uniformly damp (many prefer dry hair for clipper work).
- Drape the person with a cape.
- Organize your tools for easy access. Make sure your clippers and trimmers are oiled and working correctly.
- Ensure you have excellent lighting from multiple angles.
- Section Off the Top Hair:
- Using your cutting comb, create a clear horseshoe-shaped parting around the crown of the head. This separates the longer hair on top (which will be cut later or kept as is) from the sides and back where the taper will be applied.
- Secure the top section neatly with sectioning clips if it's long enough to interfere.
- Establish the Initial Low Guideline:
- Select your shortest desired length for the very bottom of the taper. This could be clippers with no guard (lever closed for the shortest cut) or a short guard like a #0.5 or #1.
- Starting at one sideburn, create your first guideline. For a low taper, this line should begin low, typically just above where the ear connects to the head.
- Continue this line, curving gently around the back of the head towards the other ear, keeping it low and following the natural contour of the hairline at the nape. Aim for symmetry. This is your foundational line.
- Create the Next Guideline (First Fade Section):
- Attach the next size guard up to your clippers (e.g., if you started with a #1 guard and lever closed, you might now use a #1 guard with lever open, or a #1.5 or #2 guard with lever closed).
- Create a new guideline approximately half an inch to one inch above your initial guideline, working all the way around the head.
- As you cut this new section, use a slight scooping or C-stroke motion with your clippers, flicking your wrist outwards as you reach the top of this section. This begins the blending process.
- Blend Between Guidelines (Erasing Lines):
- This is where the "fade" happens. To blend out the hard line between your first two guidelines, adjust your clipper lever or switch guards. For example, if your first line was with a #1 closed and your second with a #2 closed, you would now use the #1 guard with the lever partially or fully open to soften that line.
- Use light, upward strokes, focusing on just the line itself. The corner of the clipper blade can be very effective for detailed blending.
- Repeat this process: create a new guideline with a longer guard, then blend the line below it. Continue working your way up the head until you reach the desired length where the taper will meet the longer hair or the parietal ridge.
- Refine the Taper with Clipper-Over-Comb (Optional but Recommended):
- For a more seamless and professional-looking blend, especially when transitioning the fade into the longer hair near the parietal ridge or the sectioned-off top, the clipper-over-comb technique is invaluable.
- Hold your cutting comb parallel to the head at the angle you want to cut. Lift sections of hair with the comb and cut the hair that extends beyond the comb's teeth with your clippers (usually with no guard or a longer guard). Move the comb and clippers together in a smooth motion.
- Address the Top Section:
- Unclip the top hair . Decide on the desired length and style for this section.
- You can cut the top using scissors for more texture and layering, or with clippers and longer guards for a more uniform length.
- Ensure a smooth blend from the tapered sides into the top section. This might involve using shear-over-comb techniques or point cutting with scissors.
- Detail and Line-Up:
- This is a critical step for a sharp, professional finish. Using your trimmers (outliners), carefully create clean, crisp lines around the ears, the sideburns, and the neckline.
- For the front hairline (if applicable), create a neat line-up. If desired, define the C-cup area around the temples.
- Remove any stray hairs and ensure all edges are sharp.
- Final Check and Styling:
- Thoroughly check the entire haircut from all angles. Use a handheld mirror to inspect the back. Look for any uneven spots or lines that need further blending.
- Brush off any loose hairs.
- Apply appropriate styling products (pomade, clay, paste, etc.) to style the top hair as desired and complete the look.
For visual learners, many YouTube channels offer barbering tutorials that can supplement these written steps. Look for reputable barber educators.
🎧 How to do a Low Taper Fade
Listen to this step-by-step audio guide and master the art of doing low taper fade at home.
Low Taper Fade Style Variations for Different Hair Types
Curly Hair Low Taper Fade
The natural volume of curly textures pairs beautifully with a subtle low taper. This approach maintains the hair's bounce while creating clean edges.
- Use longer guards (#2-4) to preserve curl definition
- Consider a scissor-over-comb technique for blending
- Leave more weight at parietal ridge for balance

Straight Hair Low Taper Fade
Straight textures show every detail, making precision essential. The contrast between faded sides and textured top creates striking dimension.
- Shorter guards (#0.5-2) create sharper contrast
- Use clipper-over-comb for seamless graduation
- Consider disconnected styles for bold looks
Thick Hair Low Taper Fade
Dense hair requires strategic thinning to prevent bulk while maintaining the fade's smooth progression from short to long.
- Use thinning shears for bulk removal
- Create wider blending zones between guards
- Consider undercut elements for weight reduction

Fine Hair Low Taper Fade
Delicate hair benefits from a softer fade approach that creates the illusion of density while maintaining a tailored appearance.
- Use texturizing techniques at the crown
- Keep fade lines slightly blurred
- Consider messy textured tops for fullness

Adapting Your Low Taper Fade Technique
The versatility of the low taper fade haircut makes it suitable for nearly all hair types when properly adapted. Key considerations include:
Growth Patterns
Accounting for cowlicks and whirls when establishing guidelines
Texture Management
Adjusting techniques for coarse vs fine hair textures
Density Considerations
Modifying guard progressions based on hair thickness
Low Taper Fade Maintenance & Styling Guide
Frequency of Touch-Ups
Sharp Look
Every 2-3 weeks for crisp lines and fresh fade contrast
Natural Growth
3-4 weeks for gradual grow-out while maintaining shape
DIY Maintenance
Weekly touch-ups with trimmers for neckline and edges
Styling Product Recommendations
| Product Type | Best For | Application Tips |
|---|---|---|
| Matte Paste | Textured, messy looks | Work through damp hair, twist strands for separation |
| High-Hold Pomade | Slick backs and side parts | Apply to dry hair, use comb for precise placement |
| Sea Salt Spray | Beach waves and volume | Spritz on damp hair, scrunch and air dry |
| Fiber Clay | Structured yet pliable styles | Warm between palms, apply to ends first |
Between-Cut Care Routine
- Use sulfate-free shampoo to preserve natural oils
- Condition mid-lengths to ends to prevent dryness
- Apply leave-in conditioner for textured styles
- Use boar bristle brush for natural oil distribution
Extending Your Fade's Freshness
Neckline Maintenance
Use precision trimmers weekly to keep edges sharp between cuts
Blend Preservation
Apply light pomade to faded areas to minimize visible grow-out
Top Section Care
Regular trims every 4-6 weeks to maintain shape and remove split ends
Professional Barber vs DIY: Low Taper Fade Considerations
Professional Barber Advantages
- Precision blending with professional-grade equipment
- Expert assessment of head shape and growth patterns
- Consistent results with symmetrical balance
- Custom styling advice for your hair type
DIY Cutting Considerations
- Requires significant practice and patience
- Back section blending is particularly challenging
- Investment in quality tools is essential
- Time commitment for learning proper techniques
Hybrid Approach: Professional Cuts with DIY Maintenance
Many clients find success with a combination approach—getting their initial low taper fade from a professional barber, then maintaining edges and necklines at home between appointments. This strategy offers several benefits:
Cost Effective
Extends time between professional cuts by 1-2 weeks
Skill Building
Develops barbering techniques gradually
Consistent Look
Maintains sharp appearance between full cuts
Finding Your Barber
What to Look For
- Temple fade specialists: Check Instagram for crisp temple line examples
- Taper fade experts: Look for smooth 3-4 guard transitions in portfolios
- Certifications: Andis or Wahl certified barbers typically have advanced fading skills
- Tools: Quality barbers use cordless clippers with sharp blades
Questions to Ask
- "How many temple/taper fades do you perform weekly?" (Ideal: 20+)
- "Can I see before/after photos of grow-out patterns?"
- "What's your recommended maintenance schedule?"
- "Do you use foil shavers for sharpest lines?" (Best for temple fades)
Geographic Trends
- Urban areas: More temple fade specialists (NYC, LA, Chicago)
- Suburban areas: Better for traditional taper fades
- Barber schools: Atlanta, Houston, and Phoenix have top fade programs
Honoring Marcus T. Johnson for Grooming Education Excellence

Our Lead Barber and Content Director, Marcus T. Johnson, has been awarded the prestigious 2025 Barbering Excellence Award for his impactful contributions to modern grooming education.
Through his dedication to elevating the taper fade craft—from step-by-step tutorials to tool breakdowns—Marcus has helped thousands master at-home barbering with confidence. His leadership at TaperFadeHub.com continues to shape the future of digital barbering.
Read All Articles →Find Barbers In Your City
Browse by state, city, and neighborhood
The Ultimate Barber Glossary
Master professional haircutting terminology with our comprehensive guide to barbering terms and techniques.
Haircut Styles
Learn the differences between popular styles like high top fades, pompadours, and undercut hairstyles.
- Bald fade vs. skin fade differences
- Crew cut vs. Ivy League comparison
Cutting Techniques
Professional methods like scissor-over-comb, razor cutting, and dry cutting explained.
- How to ask for a taper haircut
- Texturizing vs. layering differences
Tools & Products
Essential barber tools and styling products compared for optimal results.
- Best clippers for professional fades
- Pomade vs. wax vs. gel comparison
Tips for a Successful Low Taper Fade
- Work in small sections: Don't try to remove too much hair or create too wide a guideline at once.
- Use light pressure: Let the clippers do the work. Pressing too hard can cause irritation and uneven cutting.
- Maintain consistent angles : Especially when creating your guidelines, consistency is key for a symmetrical fade.
- Clean your tools regularly: Hair buildup can affect clipper performance. Brush off blades between sections.
- Practice makes perfect: Don't be discouraged if your first few attempts aren't flawless. Fading is a skill that develops with practice.
Further tips and advanced techniques can often be found in professional resources and trend guides like those on Modern Salon Technique or Men's Hairstyle Trends.
Low Taper Fade How-To: Your Questions Answered
Here are some common questions about the process of doing a Low Taper Fade:
What is the very first step when starting a Low Taper Fade?
The absolute first step is thorough preparation and, if cutting someone else's hair, a clear consultation. This includes ensuring the hair is clean and detangled, all necessary tools (clippers, guards, trimmers, combs) are laid out, and you have a clear plan for the desired final look and the initial guideline placement.
Where exactly should the initial guideline for a Low Taper Fade be set?
For a Low Taper Fade, the initial guideline is established low on the head. It typically starts just above the natural hairline around the ear, then curves gently downwards towards the nape of the neck, following the head's natural contour. The key is to keep it low and symmetrical on both sides.
Which
clipper guards
are typically used to achieve a Low Taper Fade?
The specific guards will vary based on the desired shortness at the base of the taper and the hair's texture. However, a common approach might involve starting with a shorter guard like a #0.5 (sometimes called a "half") or a #1 for the lowest section of the taper. You would then blend upwards using progressively longer guards, such as #1.5, #2, and #3, to create the gradual transition. Expert resources from clipper brands like Wahl or Andis often provide detailed information on guard usage for different effects.
What's the best technique for blending a Low Taper Fade smoothly?
Smooth blending is achieved through a combination of techniques. This includes creating distinct guidelines with different clipper guards, then using the clipper's adjustable lever (if available) to create "half-steps" in length between guards. Employing a scooping or C-stroke motion with the clippers helps to soften transitions. For finer blending, clipper-over-comb techniques are invaluable. Consistent practice and a keen eye for detail are essential.
Is it realistically possible to cut a Low Taper Fade on myself (DIY)?
While it is technically possible with a lot of practice, a good set of mirrors (ideally a three-way mirror), and high-quality tools, performing a Low Taper Fade on yourself, particularly on the back of your head, is very challenging. It requires considerable dexterity, coordination, and patience. For those new to DIY haircuts, achieving a clean fade can be difficult. It's highly recommended to either seek a professional barber or to practice extensively on mannequins before attempting it on yourself.
What is the most critical part of finishing a Low Taper Fade for a professional look?
The detailing and line-up stage is arguably the most critical for a polished, professional finish. This involves using sharp trimmers to create crisp, clean edges around the ears, temples, and neckline. Ensuring the fade is even and perfectly blended from all perspectives, with no noticeable lines or patches, is also paramount to the final appearance.
Executing a Low Taper Fade is a skill that combines technical knowledge with artistic touch. By following these steps and practicing diligently, you can achieve this sharp and stylish haircut. Remember that quality tools and good lighting will significantly aid your efforts.